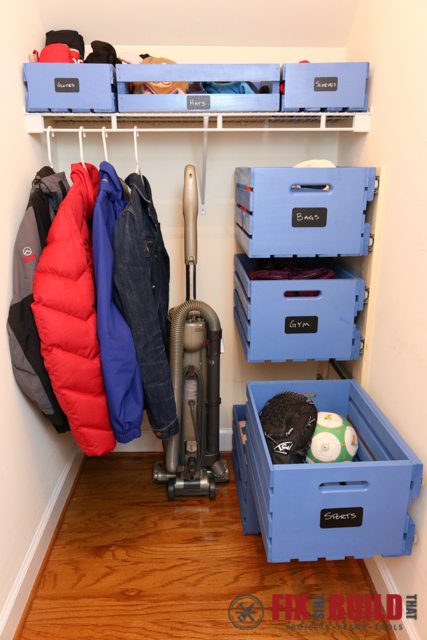
You’ve got that closet, right? The one that is weirdly shaped, super small, or just a pain to keep organized. We have one of those storage closets right off our kitchen under the stairs. It’s narrow, deep, and has a sloped ceiling in the back…and it had turned into a huge dumping ground. I needed a closet storage solution that would take advantage of the depth, give us some hanging space, and keep the small stuff organized. When CratesandPallet.com asked me to come up with a storage ides, the lightbulb went off in my head…Floating Wood Crate Storage!
First we had to clear the clutter! We did a massive clean out of all the junk that shouldn’t be in there. A bazzilion reusable grocery bags…gone. Mismatched gloves…gone. Small army of dust bunnies…gone. Then we were ready to organize! I used a combination of small and half crates on the existing wire shelves to store the little things. Then I mounted large pallet crates to the wall using full extension drawer slides so they have a small footprint but are easily accessible. Boom, floating crate storage!
Here is what you’ll need for the project:
Tools
Miter saw
Random Orbital Sander
Cordless Drill
4′ level
Tape Measure
Materials/Supplies
(3) 18″ Full Extension Drawer Slides
(4)
(1)
(2)
(2) 8′ 1×4 pine furring strips
Chalkboard Stickers
1-5/8 Wood Screws
Wall Anchors
Okay, consider this fair warning…I did this build in a closet. So some of the pics aren’t the best because I just couldn’t get good lighting and work at the same time. But you’ll get the picture…if you know what I mean ?
This is what the closet looked like beforehand. Yikes! We had way too much junk piled in the closet, so the first thing to do was to take it all out and start fresh. After we did this we decided that we really only needed half the hanging space in the back of the closet.

This was perfect because now we had a great spot for the large crates. I stacked them up and figured out the space would allow for 4 large crates to be used under the wire shelf.

To prepare the large crates for mounting I reinforced the sides with 2 sections of 1×4 furring strip. This gave me something substantial to mount the drawer slides to the crate. I cut 2 18″ pieces for each crate on my miter saw. The Mobile Miter Saw Station I built really comes in handy!

I laid out the 1×4 strips on the large crate and used 1-5/8″ screws to attach them flush with the top and bottom of the right side of the crate. I repeated this for all 4 crates.


continue reading on next page(>)
source: fixthisbuildthat.com

