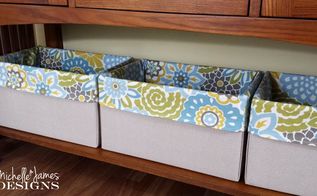
I love free things that I can make into pretty things for my home. This is one of my favorite projects. My friend Jill had a baby last September and was all too happy to get rid of the diaper boxes. I needed some storage so this is what I made.

What a difference some fabric can make…right?

First I used a newspaper print roll to create a pattern for the fabric that would cover the box. Then I used the pattern and a drop cloth from the paint store and cut out the shape.
I used spray adhesive for most of the sides and bottom then used a little (affiliate link) Fabri-tac to touch up any spots that weren’t adhering like they should.
First I sprayed the bottom and set the box onto the fabric. Then I worked on the larger sides. I sprayed with the adhesive then pulled the fabric up and wrapped the top into the box and the sides just around the corners.
The smaller sides were sprayed, then I turned the edges in and applied the fabri-tac to the turned in edges. I pulled up the fabric and turned the top into the box. The new turned in edges went right to edge of the box. You can see it in the picture below.

They turned out nice. I did have to re-stick some of the fabric but most of it stayed put.

I cut out fabric that I purchased at JoAnn’s for the liners. It was all measured and cut in pieces then stitched together. I measured the sides and the bottom width and length and added 1/2 inch seam allowances and 3 1/2 inches at the top edge so it could fold over the top of the box. I stitched the smaller sides to the bottom piece, then stitched the larger sides to the bottom piece leaving a little on the sides that did not get stitched. That seam went right up next to the first seams. If I had kept going there would have been a weird corner. Then I stitched up the sides (the corners of the liner).

I pressed the seams open and the top edge down and stitched a nice finished edge.

This was my first trial fit before finishing the top edge.
continue reading on next page (>)
source: michellejdesigns.com


