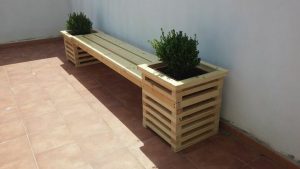
I’ve built this simple bench for a friend of mine to use on its home terrace and i featured it with two plots to fit in it some furniture plants to give it a better stylish look.
This is a really simple build project you can replicate with simple Diyer tools, cheep costs and you can enjoy all the process, so you could build your own garden furniture and for this kind of build you can also work outside , in your garden itself.
I’ve decided to make this kind of project with spruce wood because it is cheep ,it is simple to find pre-cutted size in every homedepot, already planed and ready to use. All the structure is demountable because we had to take it on the terrace so it was simoke to move on the stair with more manageable pieces; after all if you you need to unmount it and store you could do it.
I suggest you to buy planed lumber because as much is true that you pay it a little bit more but in the case of rough lumber you have to considerate the time you have to spend to cleaning up every lumber to make it ready to be handeled. Think about that.
The bench size are : 50cm H x 50cm W x 300 cm L
I will use the metric system to explain mesures because i’m italian and so we have this kind of mesures for lumber
Here is the list of material needed :
9 pieces 4×6 (lumbers are 4 meters long for every section size)
2 pieces 3×15
8 pieces 8 mm diameter stell rods with bolts and washers
Plenty of passion
PLEASE CHECK OUT ON MY INSTAGRAM PROFILE TO TAKE A LOOT AT MY PROJECT, EVERY FEEDBACK, EITHER NEGATIVE OR POSITIVE , WILL BE VERY APPRECIATE AND HELPFUL FOR ME TO GROWING UP AND MAKE PROGRESS BUILDING THINGS. THANKS A LOT.
https://www.instagram.com/vcraftcustomcreations/?hl=it
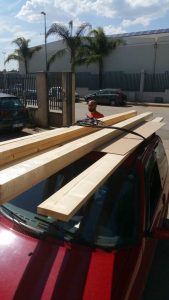
So i start : take the car, take a friend, take a baggage rack, and right at the homedepot, charge lumber on the car and direclty in the shop.
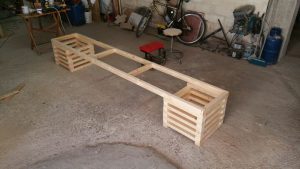
I start to build from the two plants plot that are also the structures that hold all the bench.
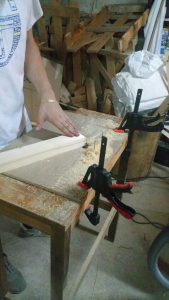
I cut 20 pieces from the 4×6 lumber and make them 50 cm long.
Than with a rudimentary router table made with a plunge router mounted under a table and rounded every sharp edge with a round bit to make them smooth at the touch.
I decided to make a strong joint between every piece using a steel rod that hold the bases in their angles so i make an hole at the two ends of each piece of lumber. For the two at the top and two at the bottom you have to prevent a flare to fit flush the bolt with its washer.
The stell rod keep the angle lap joint strong between the lumbers and serves also as a clamp during the glue drying.
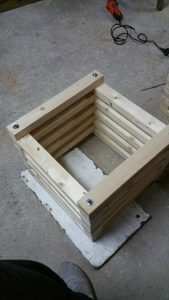
Lapping the lumber on the 6 cm, i use the first hole made at the drill press, as a guide to make the hole on the under standing lumber keeping them flush on the corner durning drilling.
Then layers by layers formed by 2 pieces each i put glue ,stick the piece on the steel rod and put just two nail to keep them in place since i reach the last layer.
Reach that i can put washer and bolt and start tighten up the bolt and set the glue dry.
Repeat the process for the second base.
For just one of the two bases i make an addition of two layers as a design choice as a frame moulding, but you could even avoid that letting a symmetrical figure.
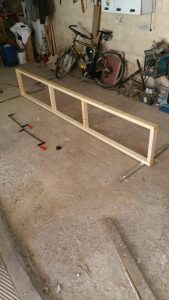
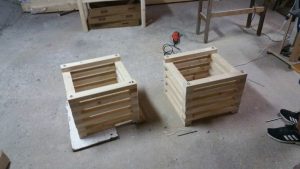
After the two bases ,i make the frame that hold the seat part.
I use for this piece the lumber on the lenght side ,so the 4 cm side is pushing on the bases.
This is a technical issue for the longer size building because the higher side of the luber has a better strenght opposing flexing during charging process and then when we are sitting on the bench. This will allow to make a stronger building .
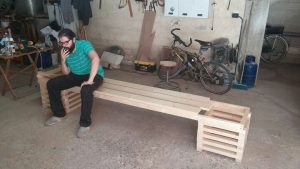
After mounting the frame and the base i take the 3×15 lumber , cut at the size sure to not overcome the plots edge , and secure the seat with wood screws. In the meantime take a break testing seat comfort.
For each plot edge i add a kind of crown moulding frame very simple mitred cut corner made from scraps to give a good looking style to everything and also a smoothing edge to touch and that will cover the horrible plastic plants plot.
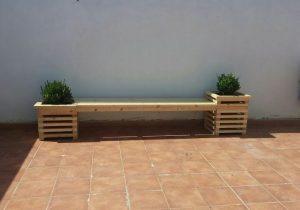
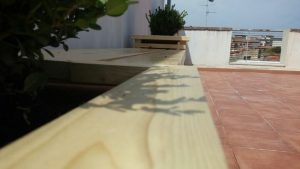
n the end i’ve send it down until 180 grit and put a satin finish on the build. Three coat should be enough. If you do this in hot day you’ll be able to put the three coats in the same day letting it dry directly under the sunlight.
 Put your favourite plants inside the plots and enjoy the build.
A mistake i made you should avoid is to use some INOX wood scres or bulding screws that are specific for external applictions so you could avoid rusty look on the normal screws if you are going to let the bench outside under the rein and sunlight.
source:hometalk.com by Vcraftcustomcreations