
Add personality and fun to your dining room by taking that yesteryear chair set and giving it a brand new paint job! All you need is a jar of paint, some brushes, and a little bit of muscle 💪. Let’s get painting!

So first off, full disclosure: this is NOT a quicky project that you can expect to knock out within the afternoon (unless you just are that determined), so it’s very important that you have the space available to store your chairs. I know this may seem rather obvious but if you (like me) operate out of your home and/or have limited square footage, you REALLy don’t want to have a living room or kitchen cluttered with half-finished chairs, especially since you risk scraping or scratching them. Not all that convenient. I’ll say that it took me (with a full time job and a house in the process of being renovated) about a week to complete my set of four chairs. It may differ in your case, but I think a week is an apt estimate. In short, have a spot to stash them while you’re not working on them. It’ll save you a headache and definitely some stubbed toes.
Anyway, moving right along. I know that you’re not here for storage advice. What brought you to this post was (I hope) this adorable chair set!
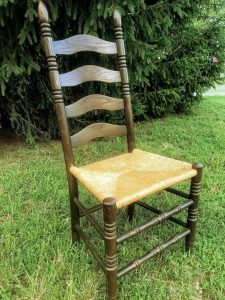
Well, these beauties came to me (as a great majority of my projects do) from my mom who had snagged them for $10 a piece at a junk antique shop in Northern Virginia. I gotta say, the woman has a nose for bargain hunting. While on a day trip up to see her, I got to see them for myself and fell in love instantly. Were they old? Yes. Were there some dings? A couple. Were they (shudder) brown? Oh yeah. But despite the scratches from (I assume) multiple generations of use, and the blandness of their color, they were still gorgeous! Ladder back design with newly rehabbed rush seats, great detailing, strong legs, and best of all: real wood! Not an ounce of pressboard or formica to be found. Perfect project material!
After loading the set into my car (I always keep my back seats empty when I visit my mom because there’s always a 90% chance she’s got something for me to take home) and driving the two hours back to Charlottesville, immediately got to work.
I knew that I wanted to bring out the pretty chestnut color of the rush seats and the classic design of the chairs with whatever color I chose; something more daring than a neutral (white/grey/black) but more subtle than a red or green. I wanted to make them bright and happy but not anything that got into “artsy” territory per se. I have to say that zeroing in on the perfect candidate was ultimately pretty easy. Even before I went to the specialty shop to browse, I already had a pretty good idea of where to land on the color wheel.
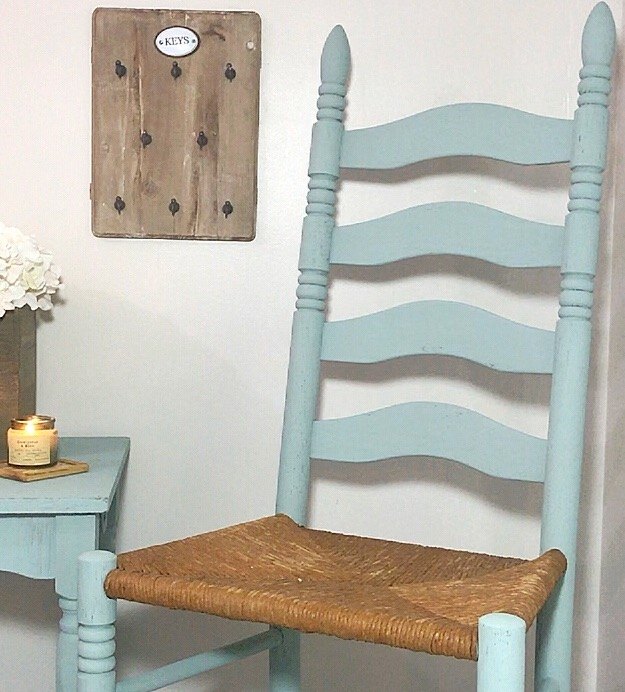
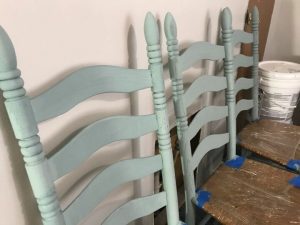
Upon seeing the chairs for the first time, I was quick to envision a sort of robin’s egg blue for the set: warm but not flashy and super cheerful! I also think it’s a color that transcends seasonal boundaries, so that they’ll keep the dining room looking lively and relevant to whatever holiday happens to be around the corner.
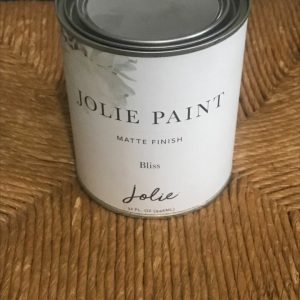
I went with the shade Bliss by Jolie Chalk Paint (their particular spin on robin’s egg blue). I must point out that this project marks the first time that I have ever used Jolie Chalk Paint. So (not to go off on too much of a tangent) here’s my condensed review of my experience with it: the paint applies beautifully and thickly enough to produce even coats. It has a consistency resembling that of Annie Sloan, which I could best describe as thicker than Rustoleum Chalk Paint while thinner than Amy Howard Chalk Paint. The color is quite vivid and does not (at least in my case) require any stirring to bring out. Having only used it once, I can’t definitively say that it’s one of my favorite chalk paints yet, but I will absolutely use it again and highly recommend it to others as well. And how great is it that (unlike many of the higher quality chalk paints) Jolie Chalk Paint is available through Amazon?! So no worries if you’d like to give it a whirl and don’t have any stockists nearby.
Now of course, I wasn’t updating these chairs for me, so I went with a color that I thought would sell to the average customer. When it comes to your own chairs, pick whatever you think works with your own tastes and what will match your kitchen/dining room aesthetic! Now, I’m not one to argue that $$ necessarily implies quality but in my experience with having worked with multitudes of chalk paint brands, I have found that the higher priced names like Annie Sloan, Amy Howard, Magnolia, and Jolie do consistently garner great results. Now that said, if you’re looking to do a project but working with a tighter budget, there are definitely some inexpensive (not the same as cheap) brands that I highly recommend. Rustoleum is great provided that you are prepared to apply at least three (sometimes four) coats as it applies rather thinly. I find it perfect for working with neutral colors (it doesn’t have many shades). I would also highly recommend Dixie Belle which if you buy in the 16 oz container, tends to run around only $25 online! And unlike Rustoleum, it has a plethora of colors to choose from.
(BTW in case you’re wondering ; these aren’t shameless plugs. I have personally tried all of these myself and regularly buy them all)
Yes, I realize I went way off track so forgive me. I just want people to know that when it comes to chalk paint and furniture updates, the options are endless if you know where to look. So anyway, back to the chairs…
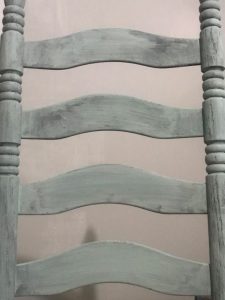
After giving each chair a thorough wipe down with a damp cloth (they had definitely acquired some dust), I applied a total of three all-over coats of paint. It only took one to see what the color was doing to revitalize them.
Now, the real challenge for these chairs lay in applying a finish that I could be sure would provide ample protection against scrapes, scratches and stains. Obviously my go-to for chalk painted furniture is wax, but the more I thought about it, the more I realized that chairs are prone to much more wear and tear than the average piece of furniture. Think about it: a lot of us have painted furniture around the house but how often do we risk leaving marks or scratching the paint? Chairs are regularly sat on (of course) but they’re also rearranged, shifted, etc. They’re at the mercy of dirty shoes, food/drink spills (anyone with kids should know this quite well). Painted furniture definitely takes care to preserve over time, chairs even more so. So for this particular project, wax just didn’t suffice for me. I needed some security for these chairs.
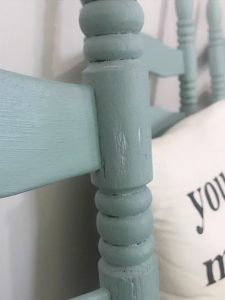
I DID go ahead and apply clear wax over the paint but more for the purpose of creating a base. I knew that I wanted to add white wax for detailing (these chairs had so much exposed wood grain; it would be a sin not to highlight it). So with a solid coat of clear wax over the whole surface, I could add white wax and not worry about staining the paint. I could go on about the importance of applying clear wax prior to any colored waxes, but I don’t want to go off another tangent, so I’d recommend checking out my other posts for more details on this.
Now, for the actual finish…First I thought of applying a wipe-on polyurethane but honestly, just the thought of having to apply multiple coats and sand off the excess on such a detailed surface was migraine-inducing. People think waxing is strenuous, just imagine using sandpaper to buff a chair leg instead of a rag. No thank you!
Now, I had heard of Dixie Belle’s Gator Hide finish, but I had never had a chance to use it. I only recently discovered a shop in my area (it’s called The Hive, in case there are any locals among you who’d like to know what you’re missing) that carried Dixie Belle products. The owner recommended Gator Hide as a substitute for wax and I was anxious to give it a try. I had just spent days mudding and painting a ceiling and my arms were completely exhausted, so skipping the strenuous wipe-on/wipe off process of waxing…too good to pass up.
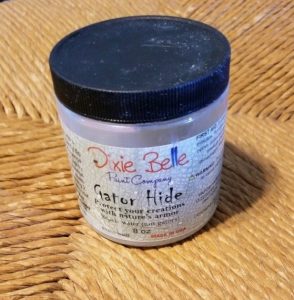
So I went home, gave it a try and 🥁🥁🥁🥁 WOW! I CAN. NOT. recommend this product enough! Not only does it apply smoothly and evenly but it creates the perfect protective shell around your surface! And best of all, unlike polyurethane or wax…no buffing required! Once applied, it hardens within just a few minutes and is perfectly smooth to the touch. It gives the item a nice, subtle sheen without crossing into glossy territory (I don’t particularly like “shiny” surfaces). It also applies as a liquid so it’s very easy to work the product into corners or detailed surfaces.
I applied two GH coats with a clean sponge over each chair, and then let them sit overnight. By morning: voilà!

After a week’s worth of work, I was ready to get these babies off my hands and on the market! I was thrilled with the final result. Definitely not effortless by any means (like I said, not an afternoon project). Chairs require commitment, time and patience. But if you’re a DIYer/upcycler at heart, projects like these tend to be by far the most rewarding! You’ll look back on the hours/days/weeks of work with pride to have at last reached the finish line.
Good luck fellow furniture flippers! I hope your own chair sets turn out as wonderfully for you as mine did for me. Just remember to have fun! Grab your headphones, turn on some
music, pour yourself a beverage and get to painting. 😉
source:hometalk.com by Melina | littlepintrestorations