Nailing every 8 inches or so (lining up the nails on each side) and three in the ends of each plank was sufficient. If I had a stubborn plank that was bowed or did not want to lay flat, I would add a few more.

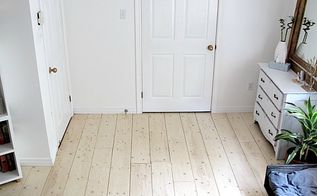
I did not butt the planks up flush with one another because I was worried about the floor buckling if the wood expanded with the seasons. In some spots I used a quarter to make sure there was a gap, in others I just eyeballed it. Because my cuts were not 100% precise, there is definitely a variation in the gaps between the boards, which is okay. Some are a little wide for my liking, but that really can’t be helped and I guess it adds to the character of the floor.

All of the boards were finally down, and I was ready to add the stain. Before I did, I vacuumed the floor really well, using the nozzle to suck up any sawdust or debris that had fallen between the cracks as we were working. I settled on Minwax Pickled Oak as my stain of choice. I love the look of whitewashed flooring, and I also thought that if I had stained them darker, it would result in them looking more like plywood.

To apply the stain, I used a 7.5″ Shur-Line stain applicator and it worked really well! It went on smoothly and evenly, and took no time at all to cover the floor. I did inside the closet first, and then worked my way from one side of the room to the other, going towards the door so I didn’t box myself in.
continue reading on next page (>)
source: hometalk.com


